


I often hear families express a wish to go camping ‘in the wild’ (dispersed camping), but that they don’t know where to go. The biggest concern seems to be how to easily distinguish public land (BLM and National Forests) from private land (and reservations). I realized that it’s always my husband or our friends finding our spots, so I did my homework and I have turned it into an easy step-by-step guide for you (including a visual example). You will learn how to use the backcountry map, CalTopo, and what to look for when using Google maps when finding potential camp sites.

easy step-by-step guide: how to find wilderness (dispersed) camp spots using Google and CalTopo.
What is dispersed camping and what does it require?
But first, you need to make sure you are ready for dispersed camping. Dispersed camping means setting up camp anywhere you’d like on public land. It’s the opposite of designated or developed camping (camp spots/campgrounds/camp sites). You will find no amenities and no marked sites. A trail-rated or 4x4 vehicle is recommended, but far from always necessary. There are lots of dispersed spots to find with easy access. But you have to be self-sufficient to a great extent when it comes to food, water, shelter, gas, etc, as well as packing everything in with you (leave no trace behind).
If you are not sure if you're ready yet, I suggest starting out with some primitive camp sites or camping with friends. We started out in very primitive designated camp sites (unmarked sites in designated camping area, often found in State Parks) that usually had a vault toilet and maybe a fire ring and grill. It felt like dispersed camping, but the campgrounds were easy to find via Google or local camping books and we always had easy access to the sites. (I just came across this website with mapped out camping spots of all types that might be a good place to start in addition to Google map searches).
How to find a dispersed camping spot using Google Maps and CalTopo:
If you want to find your own spot (or check out the area of a known spot), I recommend you do the following:
Decide on the area you’d like to explore. A deciding factor for us is usually weather. In the summer we look for water or elevation for cooler temperatures. In the winter, we look for milder temperatures in the south and avoid elevation. It could also be natural or cultural sights drawing our attention, such as hot springs, abandoned pueblos, spectacular views, hiking trails and so on. The more private and rural, the better, so we often avoid any popular sight.
Once you have decided on an area, use Google Maps satellite view to scout a potential camping spot. Look for clearings off forest roads or sand banks on rivers and lakes. Place a pin in all the spots you see. Half of them might not be accessible.
Ask Google for the directions to the pins from your home, just to get a feel for the road access. You may have to zoom in and out a few times near your pin to make sure there is a forest road connecting the main roads to your pin.
Copy the coordinates of your favorite spot and open caltopo.com in a new window in your browser. CalTopo is a backcountry map which offers an overlay feature including a topographic map of the country and many useful details about the conditions of the area you wish to explore. (CalTopo has an app for Android phones, but it is far more user-friendly on a desktop) FreeRoam app and PublicLand app are great on-the-go alternatives for a quick overview of public land). Paste the coordinates into the search field and enter. Please note that CalTopo doesn’t place a pin in your coordinates like Google Map does, but you will get to the exact coordinates when zooming in.
Start applying relevant filters (overlays) in the Map Builder to the right ONE, MAX. TWO OVERLAYS AT A TIME. The overlays we always apply are:
Land Management - This filter shows you in color coding who owns the land you will be camping on. Have your route planned out in Google and zoom out in CalTopo to find out if you will be going through private land on the way to your spot. If so, you are likely to meet locked gates. Call the local ranger in advance to inquire about locked gates. You really don’t want to find out out there. There can be some restrictions to where to camp in in Forest Service areas and state parks, so always double check with the local ranger. Look for BLM/BOR (Bureau of Land Management), USFS (US Forest Service), NPS (National Parks Services) and State (State Parks). Some FWS (US Fish and wildlife Service) might also offer camping. Local (private), Tribal (Reservations), and DOD/DOE (Department of Defense/Department of Energy) rarely offer any camping options.
Contours and Slope Angle Shading - This tells you how steep the terrain is and if you are next to a cliff. You want to make sure that the beach you have scouted on Google maps is actually accessible and not a 20 ft drop. You also want to make sure that the terrain if flat enough for setting up camp easily. These are useful filters for camping on mountains or in windy areas (being up against a cliff can provide some shelter). The closer the contour lines, the steeper the terrain. If your spot is well within two lines you should be okay (verify by checking how many feet are between the contours to the distance on the map, e.g. 40 ft (vertical) rise over 54 yards (horizontally) (not a lot).
Related: Check out this easy-read and awesome guide on how to read topographical maps.
Fire History and Fire activity - This is great for the West and Southwest where wildfires are ever present in the summer months. You will find out details about current fires, but also if your spot is in recently (within the last few years) burned area. You don’t really want to set up camp in a charred field. It takes a long time for a forest to recover from a wildfire, so an area can be scarred for decades. We have once done an overland trip in a forest with an ongoing fire. We were far enough south to not be affected by it at all. Fires are color coded (yellow being the oldest, red being the most recent. If you zoom in on a color coded area, it will tell you the name of the fire (larger ones). (Source: Caltopo.blogspot.com)
Weather Forecast and/or Weather Stations - Look for how cold (night) and how hot your spot gets. It is extremely useful for camping early season or during winter in areas that receive snow. You can see how much snow is on the ground and how much precipitation is predicted (or received). The wind is also important to check, especially in the windy spring season in the Southwest. I often just use the regular weather forecast for mid-season trips, but this overlay gives you more details and actual local readings. You will need to zoom out to find the nearest weather station if you apply that overlay. Click on the temperature in the white mark and the details appear. If your spot is too cold at night, you can always look for a spot in lower elevation. You can easily read the elevation in the white box top right (below the Map builder feature) when you hover the cursor over an area. As a general rule, temperature increases by about 3.3°F for every 1,000 feet down you go in elevation.
Use the Gaia App (Trail maps) for real time route planning, reading and sharing as well as for downloadable maps of the area. You can’t rely on Google maps to take you to your destination, even if you’ve downloaded the map ahead of time. We have seen how Google sometimes puts us on the wrong side of a river or on a road that doesn’t exist. You end up easily getting lost this way or behind locked gates (true story, no names mentioned). The Gaia App charges you a fee, but trust me, it’s worth it.
Additional word of advice for dispersed camp site spotting:
An easy way to get familiar with this method and with CalTopo is to test this on an area you know.
Always look for at least two spots near each other (within a short drive). Your spot might be occupied or otherwise unfit for camping use (despite your homework), so you should always have an alternative ready. Also look for potential spots coming in and stop if you see a great one. There is no need to keep going if you have a chance of getting out of the car earlier (and getting a well-deserved beer sooner). Check out your other scouted spots if you get a chance, just to confirm that they would work and to know for next time.
Let me give you an example of how to find a dispersed camping spot using Google Maps and CalTopo
Say, we want to camp near Mount Taylor which is about two hours west of Albuquerque, NM. We know of a popular hike, the Gooseberry Springs Trail, to the top of the mountain from our local hiking book, but we don't know if it's possible to camp near the trail head, or if we even want to.
Tip: CalTopo has a lot of information to load and uses color coding for some overlays, so avoid applying all your filters (overlays) simultaneously - and be patient.

Scouting for clearings off forest road 193 when finding dispersed camping sites near Mt. Taylor, NM.
Step 1: I first locate the trail head on Google Maps and get the directions from my home to the pin (not pictured). This tells me which forest road off the main road it sends me, so I know which forest road to camp off.
Step 2: I then start scouting for clearings off the forest road, usually a bit set back from the road. I also look for spots about a mile away from the trail head, assuming its popularity will cause some traffic. We have a dog, so we want to stay clear of cars and neighbors. Once I find a good spot, I check the distance to the trail head, just to be sure we’re not too far or too close.

Scouting for camping spots near the Gooseberry Spring Trail, Mt. Taylor, NM.
Step 3: I then copy the coordinates of my pin in Google Maps and plug them into the search field in CalTopo. The first overlay (filter) to apply is the Land Management (pictured below), just to verify that we are on public land and won’t go through any private land there. I zoom out to get an overview of our route. The area is marked in green (USFS) and we are traveling on public roads there, so we are fine. (Googling Gooseberry Springs Trail also gives me the land management, but this is a good exercise to learn how to read the map).

Checking land management in CalTopo to verify we are not camping or driving through private land (which could mean locked gates).
Step 4: When I looked up the coordinates in CalTopo, I immediately noticed that my spot is actually another forest road. This may be a good thing since it’s dead-end, so there won’t be much traffic and we can get a bit further away from the main forest road. But it may also be a problem if the road is nothing but a worked up mud field or otherwise unfit for setting up camp. I look for alternatives in the area (which you should always do no matter what).

Applying contours
Step 5: I clear the land management filter and apply contours and temperatures (above picture). My spot has a 10 ft vertical increase over 50 meters (54 yards) which won’t be an issue. The closer towards the trail head I go (East/right on this map), the closer the contours are, so the steeper the terrain gets. If I go West in the road, I will be on a ridge as well, so my spot is well located in a ‘dip’. I look up the lowest temperatures measured the past 24 hours knowing that I am in higher elevation on a mountain and it’s still early season (summer wise). The lows are 35 degrees F. according to the color coding.
Step 6: The contours indicate that I shouldn’t worry about cliffs in my spot, but I apply it anyway (after clearing the temperature overlay). The angles are color coded and gives you the degree of steepness. It is useful to apply this when camping in a valley and when looking for shade and wind protection as well as water access.
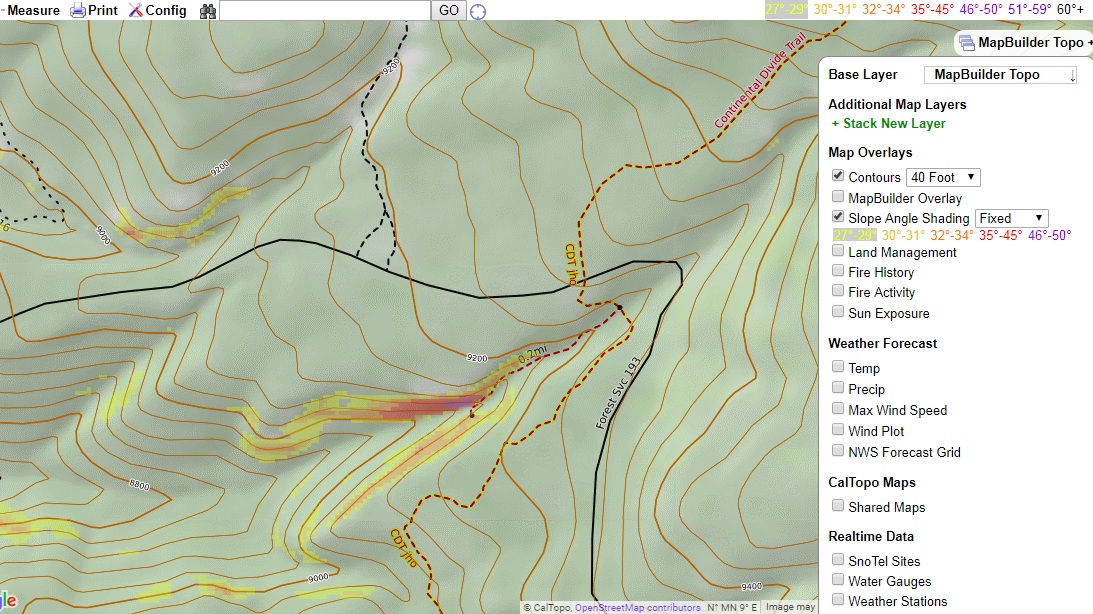
Slope angle overlay in CalTopo indicate cliffs.
Step 7: I clear the filters and apply the weather station overlay for real time readings and wind speeds (pictured below). I have to zoom out to find the nearest weather station, then click on “72” in the white marked area. I am able to select wind patterns for the current month which helps me decide where to set up camp once out there (make sure we are sheltered). NOTE: Make sure the weather station is located at a similar elevation as your spot (remember, 1000 ft changes the temperatures by 3,3 degrees F.)

Applying Weather Station overlay in CalTopo when finding dispersed camping spot, Mt. Taylor, NM.
Step 8: I then apply Fire History and Fire Activity. My spot is in the dead center of below map, and it’s clear of any fire history. You will get details of any fires when zooming in on one. A current fire will be marked with a red flame. As mentioned earlier, we have done a trip through a forest with a current wildfire going, but we never saw any signs of it. If you see a current fire or an old fire on your map, call the local ranger to inquire about the current conditions of the forest, warnings/evacuations, restrictions and so on. ALWAYS KNOW IF THERE IS A FIRE BAN, AND PUT OUT FIRES ENTIRELY. To better understand how to read the fire map in CalTopo, follow this link.
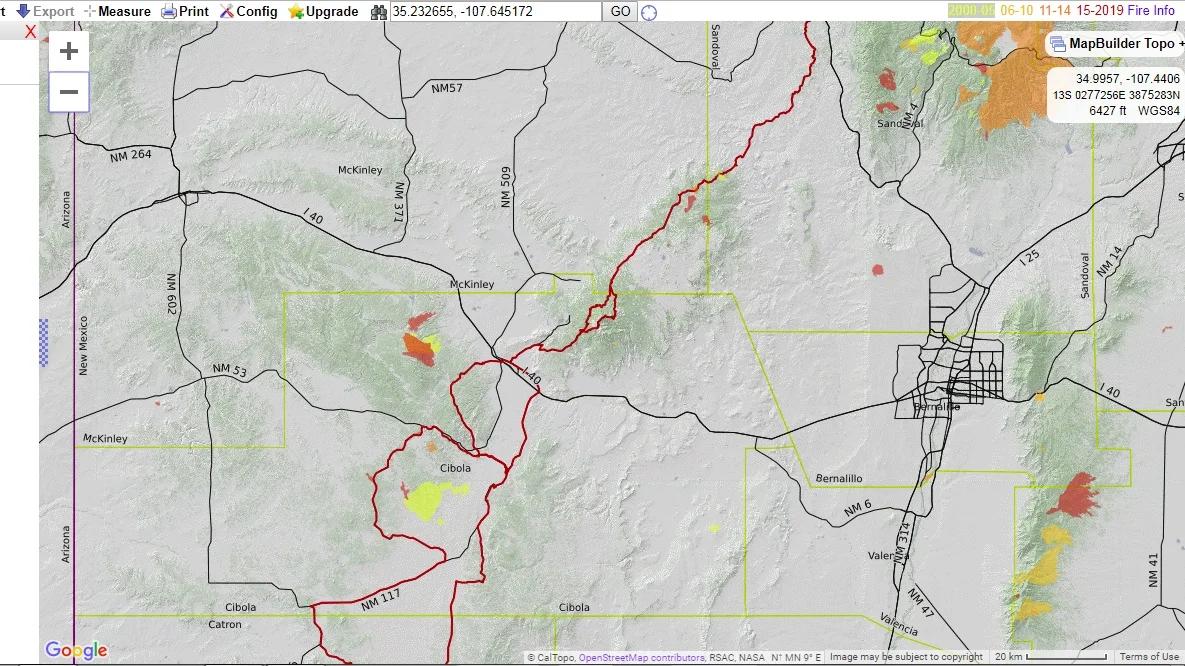
Applying Fire History and Fire Activity in CalTopo to make sure our camping spot is not in an old charred location.
GENERAL SAFETY ADVICE FOR ALL TYPES OF CAMPING
There are so much to mention safety wise that I can’t possibly cover it all. But remember that you need to be more or less self-sufficient for any type of rural camping. That extends to the obvious such as water, food and gas, but also first aid readiness, driving/mechanic skills and weather precautions. You are also limited to where your car will take you. Most cars can travel on forest roads, but some roads are in such bad conditions that you need an off-road vehicle of some kind. Most trail rated Subarus and Jeeps do fine, but you have to check with the local ranger before relying on making it all the way. Road conditions worsen quickly, especially after heavy rain or snow melt, so take caution and plan your route.
Always check the fire restrictions before you plan to cook all your meals over the fire. The summers get hot and dry and there are often fire bans in action, even for designated sites with fire rings. Always carry extra water, sunblock, chargers/battery pack and blankets/jackets and good boots (you may have to walk far). And always leave your coordinates/planned destination and route with family/friends/coworkers along with a planned return time. Be smart and come prepared.
Team up with friends, neighbors or coworkers that you know are great at camping or off-roading. We tagged along with friends for our first proper off-roading trips which took us to some very secluded spots which requires a proper off-roading vehicle and good driving skills. As we learned to off-road and how to be self-sufficient, we started venturing off on our own as well. You will quickly get confident, I promise.
Happy Camping!!